
I have a few wordpress blogs now, some of them had some spikes in visits, some are quite unpopular, but still I always wanted an easy and secure system to host them all without sacrificing speed and money.
After many trials and errors, I am quite happy with my actual setup which is
- PHP7
- Ubuntu 14.04
- Nginx+Memcached
- WordPress
All hosted on a 512MB droplet on DigitalOcean (ref.link) but you can easily use any VPS provider. I just like the overall DigitalOcean service and support.
Requirements
This tutorial is based on Ubuntu, if you use Centos7 you will probably have to change the installation package part, but it shouldn’t be a big deal.
- A 512 Droplet from DigitalOcean or your preferred provider
- Ubuntu >= 14.04
Before creating a droplet I advise you to go into your security settings digital ocean control panel and add the public ssh key of your pc/mac.
This will be useful once you will create your droplet because you can select the aforementioned ssh key and auto configure the new droplet to use it.
This way, the system won’t send you a password and the private key you own will be very secure.

32bit or 64bit?
If you want to get the best usable memory, choose 32bit.
It might sounds old, but 64bit programs takes more memory, so if you plan to stay on the cheap for a lot, better go for the 32bit.
I am personally running a 64bit system and it works perfectly with 6/7 blogs right now.
Backing it up?
If these blogs are important to you, select the backup options digital ocean offers you ;) it will make your life easier in case of a crash or problem.
Securing the system
Once you got your droplet up and running it’s good to secure it a bit.
If you didn’t take the time to use the public key authentication to access through ssh, you can do it now by following this guide (chapter 4) and come back here once you’re done.
Now that you can log on securely through public key authentication, it’s good to setup a little bit of firewall and security.
This isn’t a very advanced security practice, so feel free to add anything you think it’s worth.
Install & Configure Fail2Ban
To install just type
sudo apt-get install fail2ban
then copy the default config with
cp /etc/fail2ban/fail2ban.conf /etc/fail2ban/fail2ban.local
cp /etc/fail2ban/jail.conf /etc/fail2ban/jail.local
The default config should already handle SSH banning, but if you want to change the ban time, the max retries or so on go and edit the jail.local file
sudo nano /etc/fail2ban/jail.local
Add some extra iptables config
Fail2Ban uses iptables to dynamically change the config.
If you haven’t configured it here it is a simple code to start with closing all the ports except the common ones (22 SSH, 80/443 HTTP/HTTPS).
sudo iptables -A INPUT -i lo -j ACCEPT
sudo iptables -A INPUT -m conntrack --ctstate ESTABLISHED,RELATED -j ACCEPT
sudo iptables -A INPUT -p tcp --dport 22 -j ACCEPT
sudo iptables -A INPUT -p tcp --dport 80 -j ACCEPT
sudo iptables -A INPUT -p tcp --dport 443 -j ACCEPT
sudo iptables -A INPUT -j DROP
Restart Fail2Ban
Now that everything is in place, you can stop and restart fail2ban.
sudo service fail2ban stop
sudo service fail2ban start
To check that fail2ban is working properly execute
sudo iptables -S
If you see something like
-P INPUT ACCEPT
-P FORWARD ACCEPT
-P OUTPUT ACCEPT
-N fail2ban-ssh
-A INPUT -p tcp -m multiport --dports 22 -j fail2ban-ssh
-A INPUT -i lo -j ACCEPT
-A INPUT -m conntrack --ctstate RELATED,ESTABLISHED -j ACCEPT
-A INPUT -p tcp -m tcp --dport 22 -j ACCEPT
-A INPUT -p tcp -m tcp --dport 80 -j ACCEPT
-A INPUT -j DROP
-A fail2ban-ssh -j RETURN
Then you’re good to go.
Want to dig deeper? Go and read the digital ocean guide on Fail2Ban
Now let’s move on and add some swap.
Adding some Swap
I always go for the fast way to add swap.
DigitalOcean uses SSD so it’s better to use the swap as much as we can since we are low on memory.
sudo fallocate -l 2G /swapfile
sudo chmod 600 /swapfile
sudo mkswap /swapfile
sudo swapon /swapfile
These commands will create a 2GB swap file and activated, but it won’t still be permanent.
To do that, edit the fstab with
sudo nano /etc/fstab
and add a new line with this
/swapfile none swap sw 0 0
This should be enough for us.
To deep tune the swap, check out the guide on DigitalOcean
Now that our droplet is ready, we can start installing php and nginx.
Installing PHP7 & Nginx & MariaDB 10.1 & Memcached
To install PHP7 & Nginx & MariaDB in the latest version we’ll need to setup our ubuntu with a few new repos.
Here it is the short configif for ubuntu 14.04 (trusty).
In case you’re targeting a different ubuntu distro, replace trusty with the codename of your distro.
In case you aren’t sure or the repos are outdated, checkout the Nginx Download page and the MariaDB download page.
This setup will also add a custom repo for php7 made by Ondřej Surý who maintains the php packages in Debian and offers to anyone a PPA for PHP 7.0 on Ubuntu that we’ll be using.
To setup the repos use
sudo add-apt-repository ppa:ondrej/php
sudo add-apt-repository 'deb http://nginx.org/packages/ubuntu/ trusty nginx'
sudo wget http://nginx.org/keys/nginx_signing.key
sudo apt-key add nginx_signing.key
sudo apt-get install software-properties-common
sudo apt-key adv --recv-keys --keyserver hkp://keyserver.ubuntu.com:80 0xcbcb082a1bb943db
sudo add-apt-repository 'deb [arch=amd64,i386] http://mariadb.cu.be/repo/10.1/ubuntu trusty main'

sudo apt-get update
Once you’re ready install it all with
sudo apt-get install php-common php-memcached php7.0 php7.0-cli php7.0-fpm php7.0-gd php7.0-json php7.0-mysql php7.0-xml php7.0-opcache memcached mariadb-server-10.1 nginx
MariaDB will ask for a root password, choose a strong one.
Once done, secure the MariaDB Mysql installation with
sudo mysql_secure_installation
There shouldn’t need much more to do (you have already a root password, and MariaDB hasn’t added test databases).
You can now move on to configuring NGINX.
Upgrading from php 5.6?
In case you’re using this guide to upgrade to PHP7 and you already used one PPA by Ondřej Surý you might want to try this in case upgrading doesn’t work
sudo apt-get -y purge php5-fpm php5-common php5-cli php5-json
Upgrading from php 7.0?
If you used some previous guide while using the old repo ppa:ondrej/php-7.0 you might incur into this error
W: Failed to fetch http://ppa.launchpad.net/ondrej/php-7.0/ubuntu/dists/trusty/main/binary-amd64/Packages: 404 Not Found

W: Failed to fetch http://ppa.launchpad.net/ondrej/php-7.0/ubuntu/dists/trusty/main/binary-i386/Packages: 404 Not Found

E: Some index files failed to download. They have been ignored, or old ones used instead.

E: Couldn't rebuild package cache
This is because the repository is now merged into ppa:ondrej/php .
To fix it execute
sudo apt-get install python-software-properties

sudo ppa-purge ppa:ondrej/php-7.0
to remove the old repository and
sudo LC_ALL=en_US.UTF-8 add-apt-repository ppa:ondrej/php
to add the new repository.
Then you can safely update & upgrade your packages.
Prepare NGINX
Since PHP7.0 FPM comes already configured nicely with socks (it listen on /run/php/php7.0-fpm.sock ) we can directly configure NGINX to use it.
To do that, you can copy the content of this gist into /etc/nginx/ffpc.conf
https://gist.github.com/andrea-sdl/338ad1cde3841ffd7ae6.js
or just execute
wget -P /etc/nginx/ https://gist.githubusercontent.com/andrea-sdl/338ad1cde3841ffd7ae6/raw/00e24040d2e89b37269a9978540688f89b83251a/ffpc.conf
Since the file is not into the nginx/conf.d directory it won’t be automatically loaded. When we need it we will include it into the configuration.
Editing the nginx.conf
Php7.0 by default uses the user www-data, while nginx will use the user (guess what?) nginx.
This causes a bit of trouble when the nginx process tries to read/write to php fpm.
To fix that edit the nginx.conf file
nano /etc/nginx/nginx.conf
and change
user nginx;
with
user www-data;
Configuring the first WordPress on NGINX
The ffpc.conf file above will serve us in the first config of wordpress.
Let’s suppose your domain is “yourdomain.com”, go and edit the file
sudo nano /etc/nginx/conf.d/yourcustomdomain.conf
And paste there these lines
server {
listen 80;
server_name YOURCUSTOMDOMAIN.COM;
root /var/www/YOURCUSTOMDOMAIN.COM/;
index index.php;
access_log /var/log/nginx/YOURCUSTOMDOMAIN.COM.access.log;
error_log /var/log/nginx/YOURCUSTOMDOMAIN.COM.error.log;
include ffpc.conf;
}
after this, create the directory
mkdir -p /var/www/YOURCUSTOMDOMAIN.COM/
and reload nginx with
service nginx reload
Be sure to replace any reference with your real domain name :)
Adding a new blog
To get the latest version of wordpress installed into your new blog, just do
cd /var/www/YOURCUSTOMDOMAIN.COM/
wget https://wordpress.org/latest.tar.gz
tar --strip-components=1 -zxvf latest.tar.gz
Once the php files are done, you can access the domain and configure your wordpress blog.
Security tip: don’t use the same MySQL/MariaDB user for every blog. Configure a different user for each blog. (wondering how? Check the DO guide here)
Caching with Memcached and Autoptimize
Once you’re up and running you need two plugins to cache your wordpress pages
Autoptimize
Autoptimize will compress the css/html of your page.
These settings usually work out pretty well for any generic website.

WP-FFPC
WP-FFPC is our true secret.
It will cache the pages into the memcached cache, making them available to the end user with no computation at all.
The user will receive the HTML and php won’t even bother working because it will be the memcached cache that’s returning the result, making it blazing fast.
Once installed you have to add the WP_CACHE config into the wp-config.php file so edit with
nano /var/www/YOURCUSTOMDOMAIN.COM/wp-config.php
And add to the top (but within the php tags)
define ( 'WP_CACHE', true );
Once ready, configure WP-FFPC by putting the memcached default address 127.0.0.1:11211
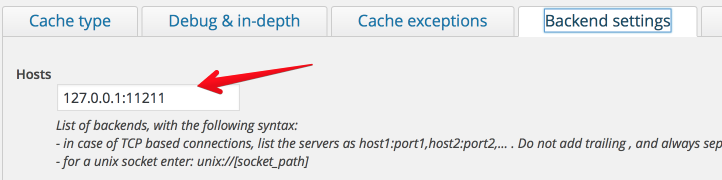
Then I also advice to extend the cache time to an entire day (86400 seconds) and even more for the taxonomy

That’s it! Now your blog should be ready and blazing fast.
Backing it up, part 2
I won’t dig into the details of backing it up, but there are some tools I advice and love
- AutoMySQLBackup to backup the databases (you will probably need a little tuning for MariaDB)
- Tarsnap if you’re a bit on the nerdy side and want to be super-sure that everything is backed up

Leave a comment