
Given the recent price/tier changes of Heroku I wanted to understand what alternatives do we have, as developers, to host a Node.js application free of charge.
Let me be clear upfront… there are not so many alternatives right now, and I can’t praise Heroku enough for putting out a free plan like the one in the past.
The new Heroku freeplan will limit the overall hours your app can stay on, therefore making it not very feasible for apps that need to be always on (although not very task-consuming).
So I decided to settle on OpenShift, and see how it would go.
To do the test I tried porting Haptime.in in OpenShift.
Let me show you what I discovered.
Differences between Heroku Node.js Hosting and OpenShift Node.js
As you might guess, Heroku and OpenShift are quite different tools although they share some similarities.
Both Heroku and OpenShift use git to deploy your app, but while Heroku is more like a black box, OpenShift gives you way more control, even SSH access.
To some people this will be very appealing because you can dig deeper into the system.
Interface
OpenShift interface is a bit less “shiny” than the Heroku one and at least to my personal preference it seems a bit outdated and old.
This doesn’t mean that it’s not functional, although Heroku offers more functionality like the Activity log.
In OpenShift this can be accomplished by using the SSH, but I prefer Heroku’s approach to this. It’s very efficient.

Services
It’s hard to beat Heroku on this, but it must be noted that many services are available as integrations.
So while you don’t have the simple “add service” like Heroku, you can achieve the same functionality in OpenShift by configuring the auth-keys (for example the secret key needed to send email through Mandrill) in your app scope.
One thing I really liked about OpenShift was that you can configure the Mongo Monitoring Service (MMS) with it, so you can track the stats of your database.
This was something I always wanted to do in Heroku but it wasn’t manageable with the free plan, nor MMS allowed it because it need the installation of an agent that Heroku doesn’t offer.
The pricing
Free as in beer?
On July 15th the old almighty “Free” Heroku plan will disappear.
It’s normal that people using that will start searching for alternatives.
OpenShift offers a free plan composed by 3 gears, this means that you will only have the ability to create 3 free application, and then you got to pay the other ones.
On the other hand Heroku will allow you to create an unlimited amount of free apps, but you’ll have to limit the time the app stays on.
Every free app will at least need to stay down/idle for 6 hours a day.
If your app doesn’t mean to be always on and can have some idle time, this plan might be for you, otherwise better look elsewhere.
As you see there is always a tradeoff, one (OpenShift) about the number of free apps you can create, the other about the time you use them.
Paid accounts
The situation is slightly different when money comes in.
In fact, the recent pricing change in Heroku makes it really affordable.
While before it might have been pricey, not it isn’t.
For 7$ you can have an “Hobby” instance.
The nice thing about the paid accounts instances is that 7$ is the maximum price. So you pay that only if your app is 100% always on.
I suppose this reduction applies only if you shut down the dyno, but we’ll look into it further to see if it also counts idle time (but I guess not…)
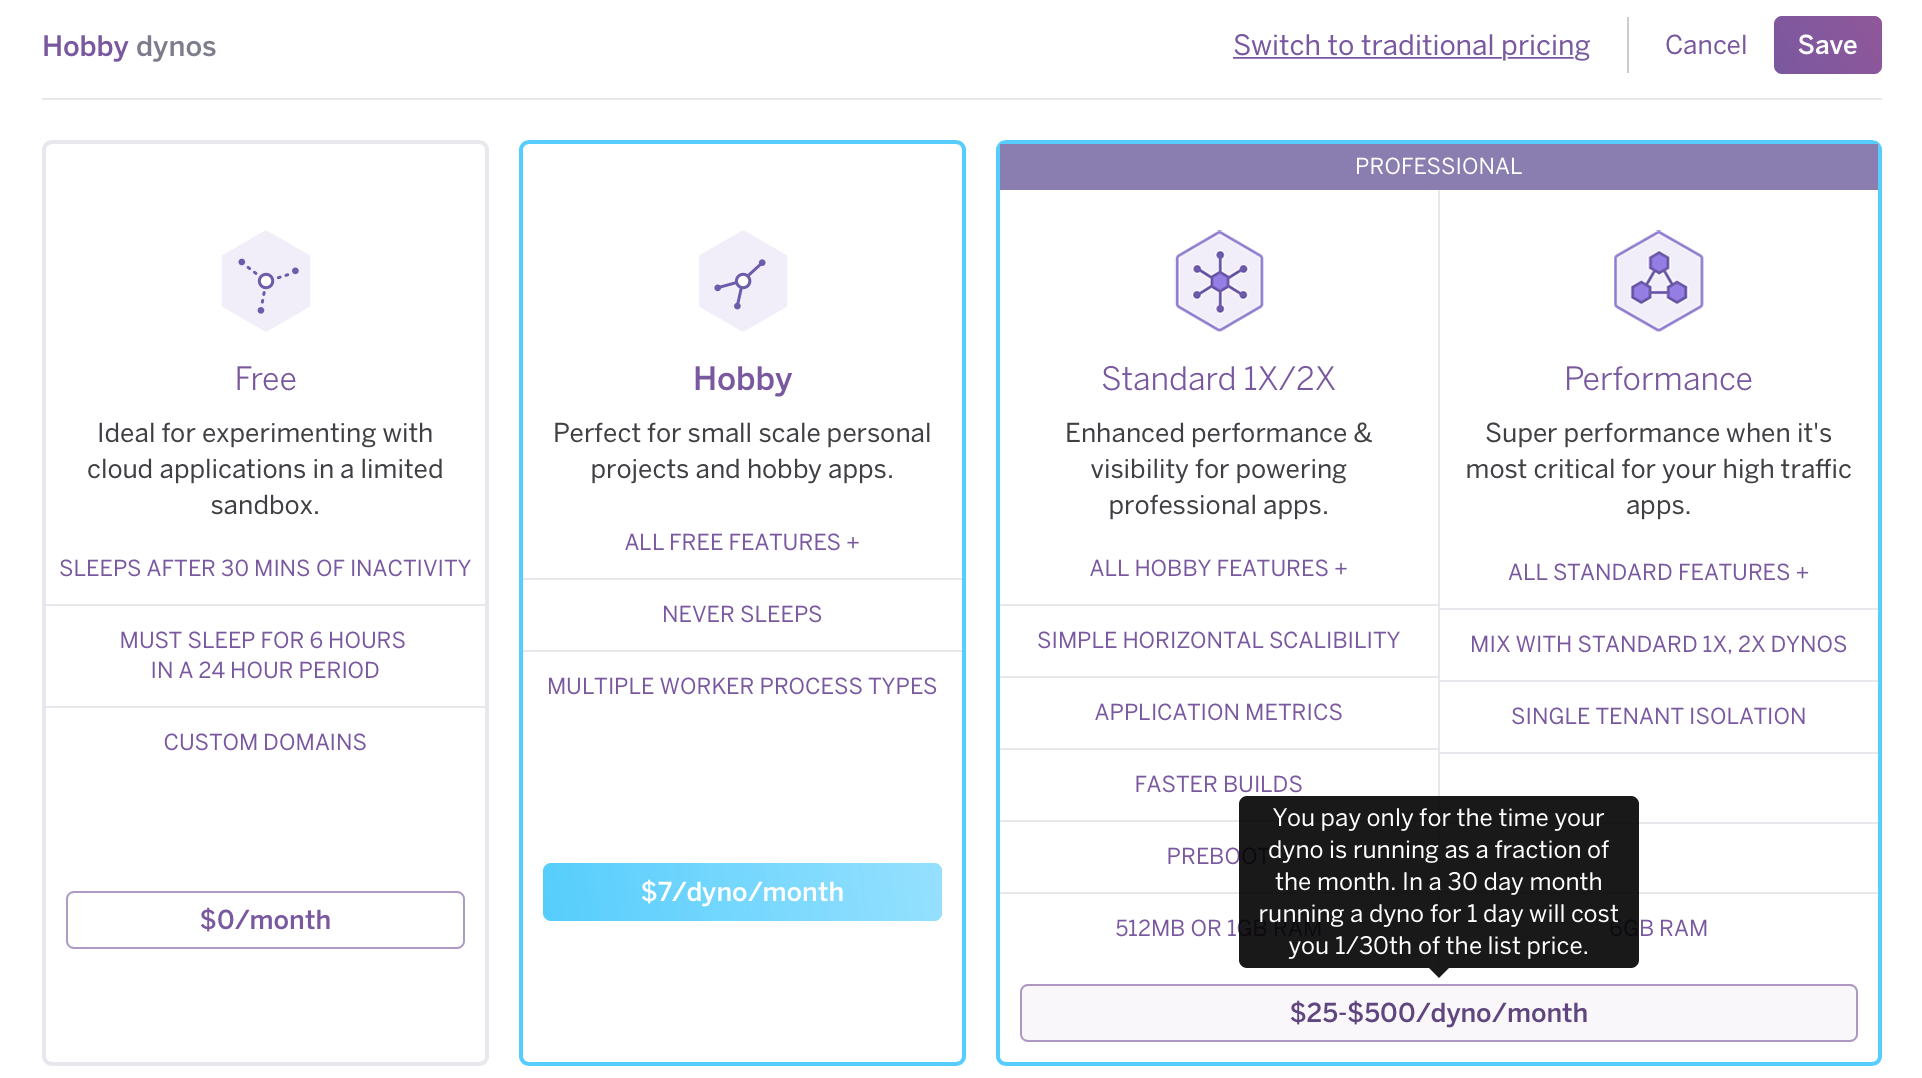
The smallest OpenShift plan (small) will cost you 0.03$/hour, this means that for a 30 days uptime you’ll pay something like 14.4$, way more than Heroku.
OpenShift also offer a Silver plan that has bigger storage and better support.

How I migrated my Node.js app from Heroku to OpenShift
To do the test I tried to port the Haptime.in to OpenShift.
I didn’t expect major changes in the codebase aside from adapting the keys used in my app.
Let’s dig into what I’ve done.
1. Install base tools
OpenShift uses the rhc tools (it’s similar to the Heroku Toolbelt).
This tutorial is great to follow along to install them on your system.
2. Creating a Node.js app
Really, it’s all about clicking and choosing the right Cartridge.
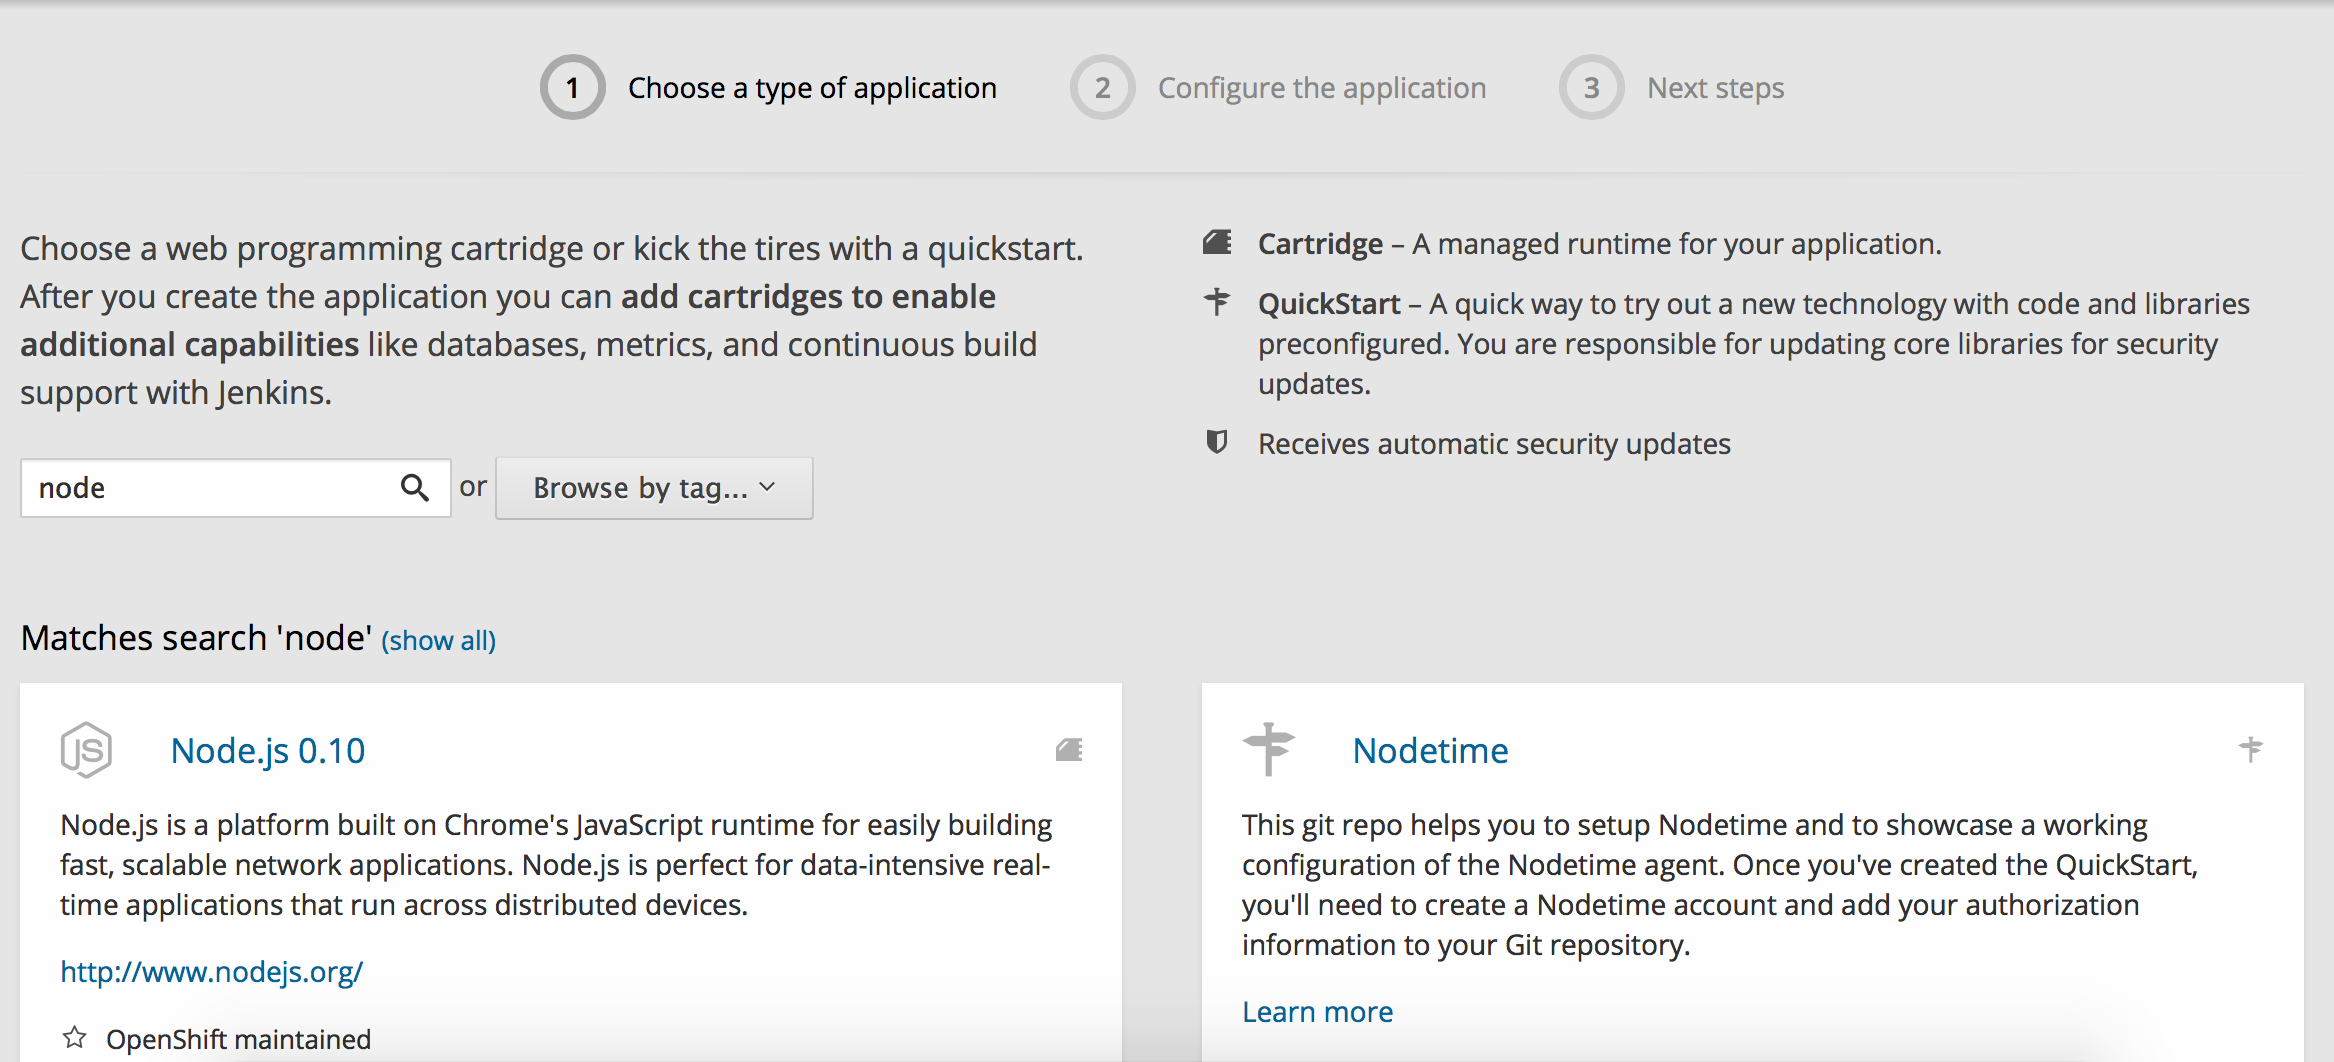
Together with the app you might want to add some other cartridges.
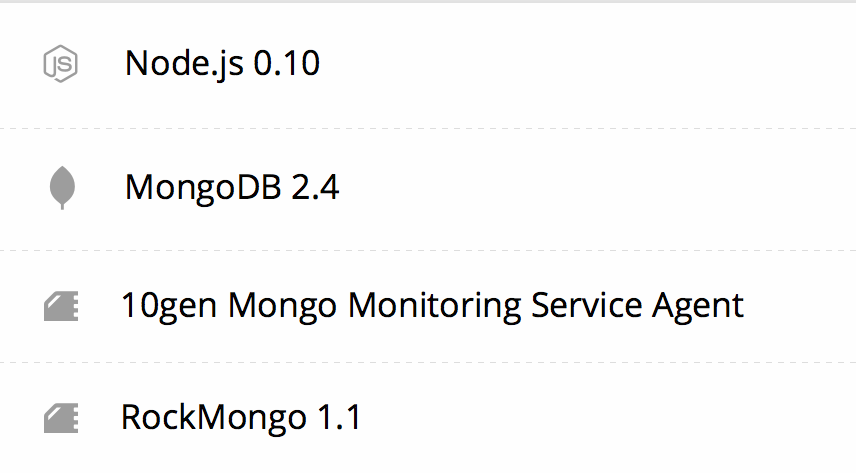
In my case the MongoDB cartridge was needed.
I also decided to add the RockMongo cartridge to have some kind of phpmyadmin, and the Mongo Monitoring Service Agent.
If you’re doing this step-by-step add the monitoring agent later because it will require you extra work in the codebase.
3. Added OpenShift endpoint to my existing Git repository
OpenShift allows you to deploy through git.
Since I already had a git repo in place I just configured the open shift endpoint on a new branch.
I didn’t want to mess up with the main branch, so I created a new branch named openshift .
Then I added a new endpoint called openshiftprod
git remote add openshiftprod ssh://284bdd9fd9764803939ac5c309634ee6@myapp-mcgrath.rhcloud.com/~/git/myapp.git/
Obviously you should use your ssh git url.

After that, I pulled the changes into my repo.
git pull ssh://284bdd9fd9764803939ac5c309634ee6@myapp-mcgrath.rhcloud.com/~/git/myapp.git/
After the pull some conflict emerged, mostly on the default Node.js files: package.json
Since I was using a different main file I didn’t get conflicts on my file.
Just so you know, OpenShift uses by default a server.js file as main app file.
In case you use that too, expect to merge that file.
You’ll also notice that OpenShift will create a hidden .openshift folder in the main folder of the repo.
Under that folder OpenShift puts some config file of its own.
3.a Merging conflicts
Merging was quite easy, in my case I had to
Put the correct file into the main
//package.json
"main": "app.js"
Change the engines section to
//package.json
"engines": {
"node": ">= 0.6.0",
"npm": ">= 1.0.0"
},
The change didn’t affect me (although before I had some higher version number), but I guess I was lucky in this case.
No other change was needed, but the code was far from being ok.
3b. Pushing from a non-master repository to OpenShift
I felt a git noob when I stumbled into this, but after I configured the repo, I tried pushing the changes to OpenShift with this command
git push -f openshiftprod openshift
openshift was my local branch, and openshiftprod the remote repo.
Nothing happened.
It was after some search that I realized that I was pushing the openshift branch into the remote repo.
The correct way to push a local branch into a master remote repo was
git push -f openshiftprod openshift:master
4. Making the code compatible
There were a few tweaks to make the code work on OpenShift, the first one was the port.
OpenShift uses a different ENV variable for this, so I changed it.
//app.js or server.js
-    var port = process.env.PORT || 8080;
+    var port = process.env.OPENSHIFT_NODEJS_PORT || 8080;
Then it was the time of MongoDB.
-var mongoUri = process.env.OPENSHIFT_MONGODB_DB_HOST || process.env.OPENSHIFT_MONGODB_DB_PORT || 'mongodb://localhost/node-db';
+var mongoUri = process.env.OPENSHIFT_MONGODB_DB_URL || 'mongodb://localhost/node-db';
And last but not least the IP address the app was listening to.
//app.js
+var server_ip_address = process.env.OPENSHIFT_NODEJS_IP || '127.0.0.1';
...
-app.listen(app.get('port'), function () {
+app.listen(app.get('port'),server_ip_address, function () {
     console.log("Express server listening on port " + app.get('port'));
 });
After all of this changes the app finally started.
4.a Changing the applications keys
If you have external services that can be used outside Heroku, you probably need to create the same Key structure or another key and set it on OpenShift.
If you installed the rhc tools, setting an ENV var is as easy as typing
rhc set-env YOUR_API_KEY=your_api_value -a your_app_name
That’s it, then you can reference it in Node.js as
process.env.YOUR_API_KEY
Now the app should be ready and up, if it’s not, try to restart it.
You can do it by interface or by SSH.
by SSH you can login into your app space with
rhc ssh your_app_name
And then type
gear stop
It will ask you for the gear number, choose the right one ;)
Then start it with
gear start
5. Adding MMS (optional)
Adding MMS required me to do a bit more work than expected and even blocked the startup of the app in the beginning (that’s why I advice it to do it later).
To make it work I had to copy the agent tar.gz into your repository under the .openshift/mms/ folder with the name mongodb-mms-monitoring-agent.tar.gz with the mms api key already put into the config file in the gz.
This must be done after you registered to MMS.
All in all it felt a bit cumbersome, but the functionality in MMS is great and worth the value although I feel it would work much easier if you have to manage the entire db server, this contained solution requires some workaround to let it work under the OpenShift contraints.
6. Fix Timezone (optional)
My Heroku app was hosted on a system with UTC timezone.
With the OpenShift I got a New_York timezone and since I got some scheduling setup, I wanted to change the timezone too.
Lucky for me, it was possible, and it was super-easy, all I needed to do was
rhc env set TZ=UTC -a my_app_name
Conclusion
I liked OpenShift, but after a while I decided to get back to Heroku.
The main reason is simplicity, I love Heroku approach and I love the freedom that Heroku gives you to create as many apps as you want.
OpenShift on the other side is a stable and mature competitor, but didn’t fit my needs perfectly.
Update 03/20/2016:
After a few months I decided to retest OpenShift.
Did something changed?
I saw that openshift continued to grow, also thanks to the community cartridges (that let you install also the latest version of node and mongo db).
I decided to do a small test, and it all worked perfectly.
I also moved away from mandrill (now I use sendgrid), and now I find myself quite happy with the overall openshift performance.
One of the things I loved the most is the command
rhc port-forward <app>
This allows you to port forward the db and the app itself, so that you can test right away to see if everything is fine. It’s also super-useful to reimport the database.
One other thing I love is the OpenShift Backup Server, a nice little webapp to backup your gears. The app is still in the early stages but it’s nice and it works.
What’s your take on the new Heroku prices and OpenShift?
TL;DR OpenShift is a nice alternative and the switch is quite easy to do, worth it if you have an always on app on the Free Tier. Personally I prefer Heroku both for pricing and interface. Moved onto OpenShift after a while and it’s going well, I love the port forwarding feature.
PS: This is just a small recap of the steps I did, if there are errors, point them out and I’ll correct them ;)

Leave a comment